Testing .NET Core using NUnit 3
Update 3 - full NUnit 3 support for .NET Core and ASP.NET Core has been released.
Update 2 - I have rewritten this post for .NET Core RC2 with new code on GitHub. I would suggest reading it and only come back to this post for details that I might have glossed over.
Update - This post was originally written against a pre-release version of NUnit 3. I have updated the code to reflect the changes in NUnit 3.2. Further updates will come once the RC2 of .NET Core is released.
We added .NET Core (DNX) support to the RC release of NUnit 3.0, but it probably isn't obvious on how to test your .NET Core applications. The test runner that ships with NUnit 3, nunit3-console.exe is a .NET 2.0 application that cannot run NUnit tests that reference the portable version of the framework. After the final 3.0 release, we plan on writing a DNX based runner, but until then, you can test your applications using the NUnitLite NuGet package to create self-executing tests. I will walk through doing this in Visual Studio.
The full source from this walk-through is on GitHub.
Most of the steps below are the same as for any test project, but I wanted to document everything. Similarly, I will go through the standard steps for going through running a DNX application. These will be familiar to anyone who has worked with .NET Core already, but may help new users.
I assume that you already have a project you want to test. In my case, it is just a simple Class Library (Package) with one class,
namespace MyDnxProject
{
    public static class Calculator
    {
        public static int Add(int x, int y) => x + y;
        public static int Subtract(int x, int y) => x - y;
        public static int Multiply(int x, int y) => x * y;
        public static int Divide(int x, int y) => x / y;
    }
}
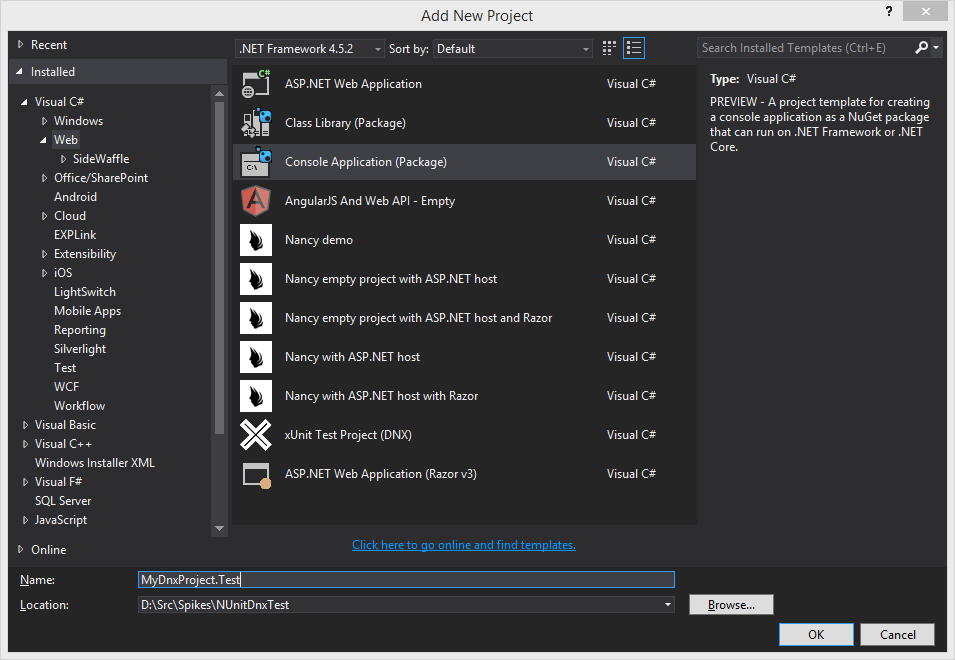
To test this project, I simply add a new test project by right-clicking on my solution and Add | New Project.... I then navigate to the Visual C# | Web node and create a new Console Application (Package).

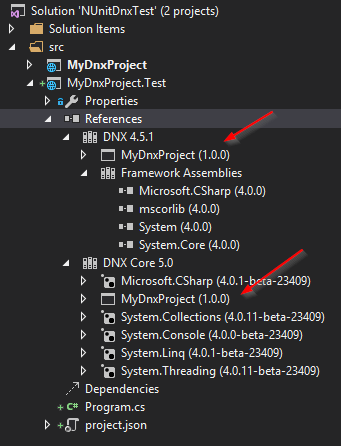
I then add a project reference to the project under test,

Next, I Manage NuGet Packages on the test project. Make sure you check Include prerelease and search for nunitlite. Adding the NUnitLite package will also pull in NUnit 3.
Now open Program.cs and replace it with the following, adjusting the namespace accordingly.
using NUnit.Common;
using NUnit.Framework;
using NUnitLite;
using System;
using System.Reflection;

namespace MyDnxProject.Test
{
    public class Program
    {
        public int Main(string[] args)
        {
            return new AutoRun(typeof(Program).GetTypeInfo().Assembly)
                .Execute(args, new ExtendedTextWrapper(Console.Out), Console.In);
        }
    }
}
The #if DNX451 is unfortunate, but the Console is not available in the NUnit portable library, so we need to pass it in. We hope to make this easier in the future.
Now, add test fixtures to the test project as you would with any test framework. Here are some simple ones for this test project.
using NUnit.Framework;

namespace MyDnxProject.Test
{
    [TestFixture]
    public class CalculatorTests
    {
        [TestCase(1, 1, 2)]
        [TestCase(-1, -1, -2)]
        [TestCase(100, 5, 105)]
        public void CanAddNumbers(int x, int y, int expected)
        {
            Assert.That(Calculator.Add(x, y), Is.EqualTo(expected));
        }

        [TestCase(1, 1, 0)]
        [TestCase(-1, -1, 0)]
        [TestCase(100, 5, 95)]
        public void CanSubtract(int x, int y, int expected)
        {
            Assert.That(Calculator.Subtract(x, y), Is.EqualTo(expected));
        }

        [TestCase(1, 1, 1)]
        [TestCase(-1, -1, 1)]
        [TestCase(100, 5, 500)]
        public void CanMultiply(int x, int y, int expected)
        {
            Assert.That(Calculator.Multiply(x, y), Is.EqualTo(expected));
        }

        [TestCase(1, 1, 1)]
        [TestCase(-1, -1, 1)]
        [TestCase(100, 5, 20)]
        public void CanDivide(int x, int y, int expected)
        {
            Assert.That(Calculator.Divide(x, y), Is.EqualTo(expected));
        }
    }
}
You can now run and debug your tests from Visual Studio by setting the test project as the Startup Project and running. You may want to add the --wait command line option to the project settings under Debug | Application Arguments. This isn't needed under .NET Core which keeps the console window open at the end of the run, but it is needed by .NET 4.5.1.
In Visual Studio, to change from running DNX 4.5.1 to DNX Core 5.0, drop down the debug project button in the toolbar and switch the CLR Type;

You will notice that if you run DNX 4.5.1, you get the full colour console output, but if you switch to DNX Core 5.0, you get the same information, but in a one colour console. We hope to update NUnitLite for DNX to support full colour soon.
Now, I assume you are going to want to run your tests from the command line. The following are the steps that will be needed. All of this is just standard .NET Core stuff, but I wanted to document it for new users.
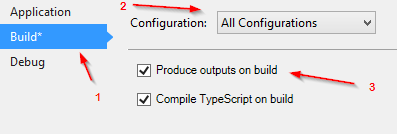
First, go into the project settings for your test project and enable Produce outputs on build for all configurations on the Build tab.

Open up a command prompt and navigate to the root of your solution. .NET Core builds projects into an artifacts directory in the solution root. CD into artifacts\bin\MyDnxProject.Test\Debug. You will notice that there are NuGet packages in this folder and app, dnx451 and dnxcore50 directories.
λ ls

    Directory: D:\src\Spikes\NUnitDnxTest\artifacts\bin\MyDnxProject.Test\Debug

Mode                LastWriteTime         Length Name
----                -------------         ------ ----
d-----       2015-11-04   2:15 PM                app
d-----       2015-11-04   2:07 PM                dnx451
d-----       2015-11-04   2:07 PM                dnxcore50
-a----       2015-11-04   2:07 PM           7018 MyDnxProject.Test.1.0.0.nupkg
-a----       2015-11-04   2:07 PM          10958 MyDnxProject.Test.1.0.0.symbols.nupkg
First run dnvm list to view the list of frameworks you have installed.
λ dnvm list

Active Version     Runtime Architecture OperatingSystem Alias
------ -------     ------- ------------ --------------- -----
       1.0.0-beta5 clr     x64          win
       1.0.0-beta5 clr     x86          win
       1.0.0-beta5 coreclr x64          win
       1.0.0-beta5 coreclr x86          win
       1.0.0-beta8 clr     x64          win             clr-x64
       1.0.0-beta8 clr     x86          win             clr-x86, default
  *    1.0.0-beta8 coreclr x64          win             coreclr-x64
       1.0.0-beta8 coreclr x86          win             coreclr-x86
Select the framework you want to run under. If it does not have a * beside it, switch to it with a command line like the following;
λ dnvm use 1.0.0-beta8 -r coreclr -a x64
Adding C:\Users\rob.prouse\.dnx\runtimes\dnx-coreclr-win-x64.1.0.0-beta8\bin to process PATH
Next run dnu restore to fetch needed NuGet packages,
λ dnu restore
Microsoft .NET Development Utility CoreClr-x64-1.0.0-beta8-15858

  CACHE https://api.nuget.org/v3/index.json
Restoring packages for D:\src\Spikes\NUnitDnxTest\artifacts\bin\MyDnxProject.Test\Debug\app\project.json
Writing lock file D:\src\Spikes\NUnitDnxTest\artifacts\bin\MyDnxProject.Test\Debug\app\project.lock.json
Restore complete, 308ms elapsed

NuGet Config files used:
    C:\Users\rob.prouse\AppData\Roaming\NuGet\nuget.config
    D:\src\Spikes\NUnitDnxTest\nuget.config

Feeds used:
    https://api.nuget.org/v3-flatcontainer/
You can now run your tests using the CMD file in the app folder;
λ .\app\MyDnxProject.Test.cmd
NUnitLite 3.0.5783 (Portable)
Copyright (C) 2015 Charlie Poole

Test Files
    MyDnxProject.Test

Run Settings


Test Run Summary
   Overall result: Passed
   Tests run: 12, Passed: 12, Errors: 0, Failures: 0, Inconclusive: 0
     Not run: 0, Invalid: 0, Ignored: 0, Explicit: 0, Skipped: 0
  Start time: 2015-11-04 19:58:56Z
    End time: 2015-11-04 19:58:56Z
    Duration: 0.038 seconds