Introduction to Unit Tests with NUnit
You have a new project and you want to add unit tests, where do you start? This tutorial walks you through adding an NUnit test project, writing your first tests and running them in Visual Studio.
This walk-through assumes you already have a project that you want to test. I am starting here with a project that contains a simple class that contains an extension method that converts an enum value to a friendly string by splitting the enum name at capitals. For example, System.Windows.Forms.Keys.BrowserBack would become "Browser Back".
The source code for this tutorial is on GitHub.
Add a Unit Test Project
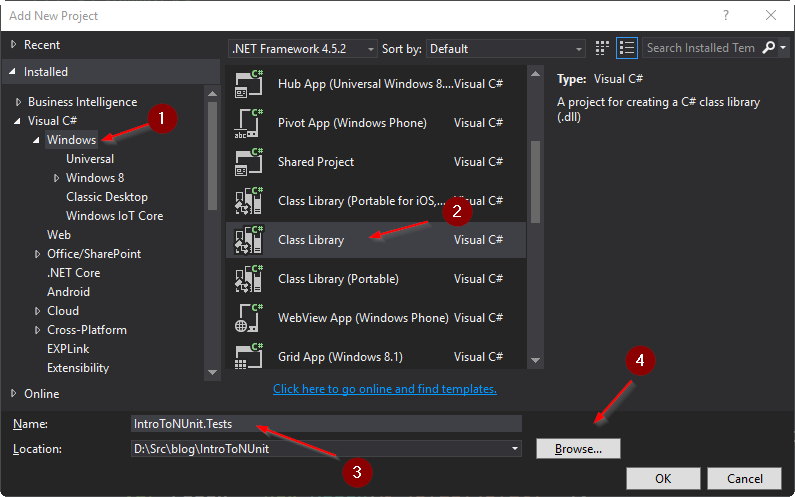
It is best practice to keep your unit tests separate from your production code, so we will add a new project that contains our tests. It is also common to name your test project the same as the project it is testing and appending .Tests. My main project is IntroToNUnit, so I will add IntroToNUnit.Tests.
- Right click on your solution in Visual Studio
- Click on Add | New project...
- Click on Visual C# | Windows and click on Class Library.
- Enter the name of your test project and click OK.
Add a Reference to NUnit
Before you can write unit tests, you need to add a reference to a test framework, in this case NUnit.
- Right click on your unit test project
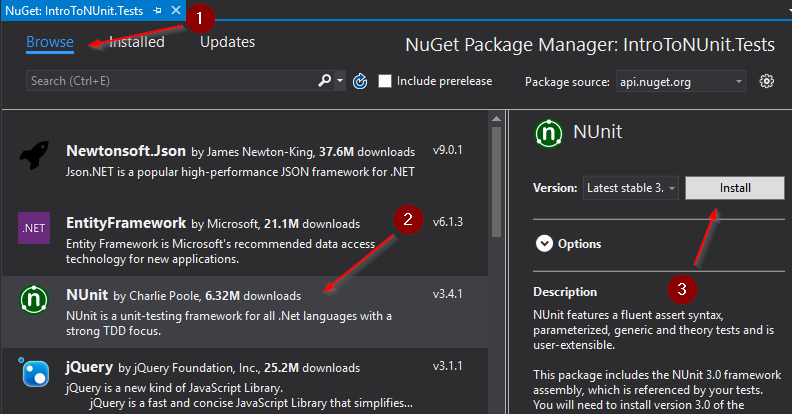
- Click on Manage NuGet packages...
- Click on Browse
- Select NUnit and click the Install button. At the time of this writing, NUnit is number three in the list. If that changes, use the search bar to find it.
Add a Reference to Your Project
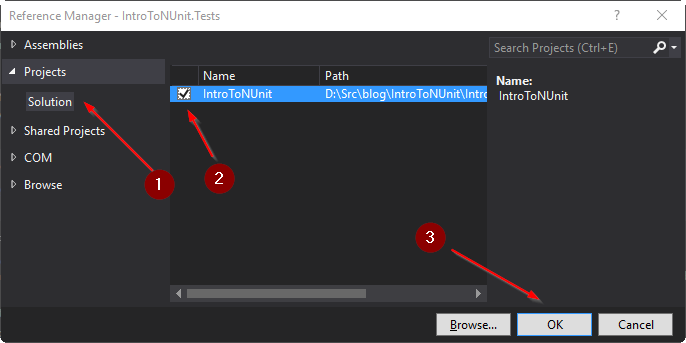
In order to test the code in your main project, you need to add a reference to it in your test project.
- Right click on your test project
- Click on Add | Reference...
- Select Projects | Solution
- Add a checkmark on your main project.
- Click OK.
Write Unit Tests
Another common convention is to name the test class the same as the class being tested with Tests appended. The class I want to test is called EnumToStringConverter.cs, so I rename Class1.cs to EnumToStringConverterTests.cs.
To this class, I add the [TestFixture] attribute. You also need to add the using NUnit.Framework. My first test is going to make sure that the converter splits multiple words correctly, so I add a test enum and the first unit test. Add this point, my code looks like this.
using NUnit.Framework;

namespace IntroToNUnit.Tests
{
    public enum TestTypes
    {
        None,
        UnitTesting,
        IntegrationTesting,
        FlyByTheSeatOfYourPantsTesting
    }

    [TestFixture]
    public class EnumToStringConverterTests
    {
        [Test]
        public void CanConvertEnumIntoMultipleWords()
        {
        }
    }
}
Notice that my test method is public and returns void and that it has a [Test] attribute to identify it as a test. You can have more complicated test methods which I will cover in future posts.
Arrange, Act, Assert
Now it is time to write the first unit test. The most common structure is known as Arrange, Act, Assert. What this means is that you group the code in your test method into setting up for the test (Arrange), then you perform the action that you want to test (Act), then you check the results (Assert). Sometimes you will find that the arrange and act steps are combined for simpler tests as in this case. That is fine.
[Test]
public void CanConvertEnumIntoMultipleWords()
{
    // Arrange/Act
    var actual = TestTypes.UnitTesting.ToFriendlyString();

    // Assert
    Assert.That(actual, Is.EqualTo("Unit Testing"));
}
In this test, I have executed the code that I want to test, then I asserted what I expected the value to be. The Assert class is provided by NUnit and allows check many conditions in your tests. In this case I am only checking that the string returned is equal to what I expected. I will cover more types of NUnit Asserts in a later post.
NUnit has two assert syntaxes. In the example code, I used the Constraint Model or sometimes the Fluent Syntax. It is called the fluent syntax because it reads very much like English and because you can continue to append extra conditions. For example, I could have also checked for null with,
Assert.That(actual, Is.Not.Null.And.EqualTo("Unit Testing"));NUnit also has a classic model/syntax that you are likely to see in other tutorials. The above Assert could also be written as,
Assert.NotNull(actual);
Assert.AreEqual("Unit Testing", actual);
Some people prefer the classic syntax, but I recommend that you use the fluent syntax. New features in NUnit are always added to the fluent syntax and only rarely get added to the classic syntax.
Run the Unit Tests in Visual Studio
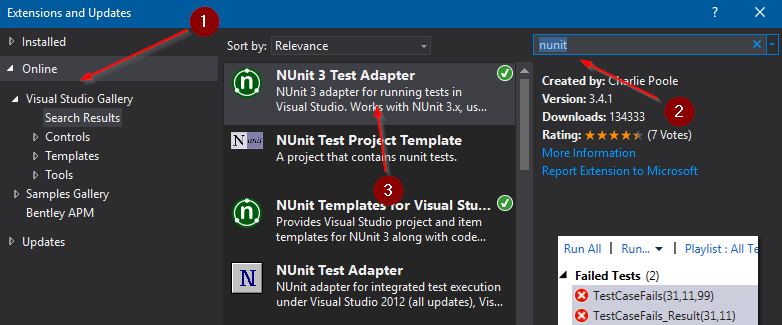
To run your unit tests in Visual Studio, you first need to install the NUnit 3 Test Adapter. To do so,
- In the main menu, click Tools | Extensions and Updates...
- Click on Online | Visual Studio Gallery,
- Search for NUnit and install NUnit 3 Test Adapter
- After you install, click the button at the bottom to Restart Visual Studio
Back in Visual Studio with your solution open, you need to open the Test Explorer Window. To do this, in the main menu, click Test | Windows | Test Explorer.
The window that opens will list your unit tests and allow you to run or debug them. Click Run All to run your tests. Successful tests will go green and failed tests will be red. You can see the results of any test by clicking on it and viewing the results at the bottom of the window. In a future post, I will cover other ways to run your tests and how to use the Test Adapter in Visual Studio in more detail.
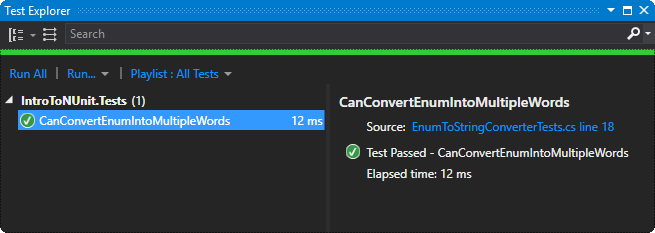
Congratulations, you have your first unit test.